Honey Warming Cabinet
Although not essential, a honey warming cabinet is extremely useful in the honey processing to heat frames prior to extraction, reheat bulk honey to liquify, heat wax etc. etc.
A good cabinet has several features:
- It has accurate temperature control
- It is well insulated
- It is large enough to hold a couple of bulk honey buckets or several super frames in a tray
- It is strong enough to withstand moving, knocks etc
The model Thorne sell retails at £210. This cost me approx XXX all in (using a old fan I already had).
This cabinet is made from 18mm thick ply (surprise, surprise), lined with scrap polystyrene sheeting, powered by mains incandescent light bulbs, and controlled by an electronic temperature controller and fan.
 |
Note: Plywood is quite heavy. If you intend to move this cabinet on a regular basis you might prefer to make it from thinner ply (although that would obviously be weaker) or make it smaller.
This project involves mains wiring and although straightforward, should only be done by a competent person. If in doubt...don't do it yourself!
- Construction
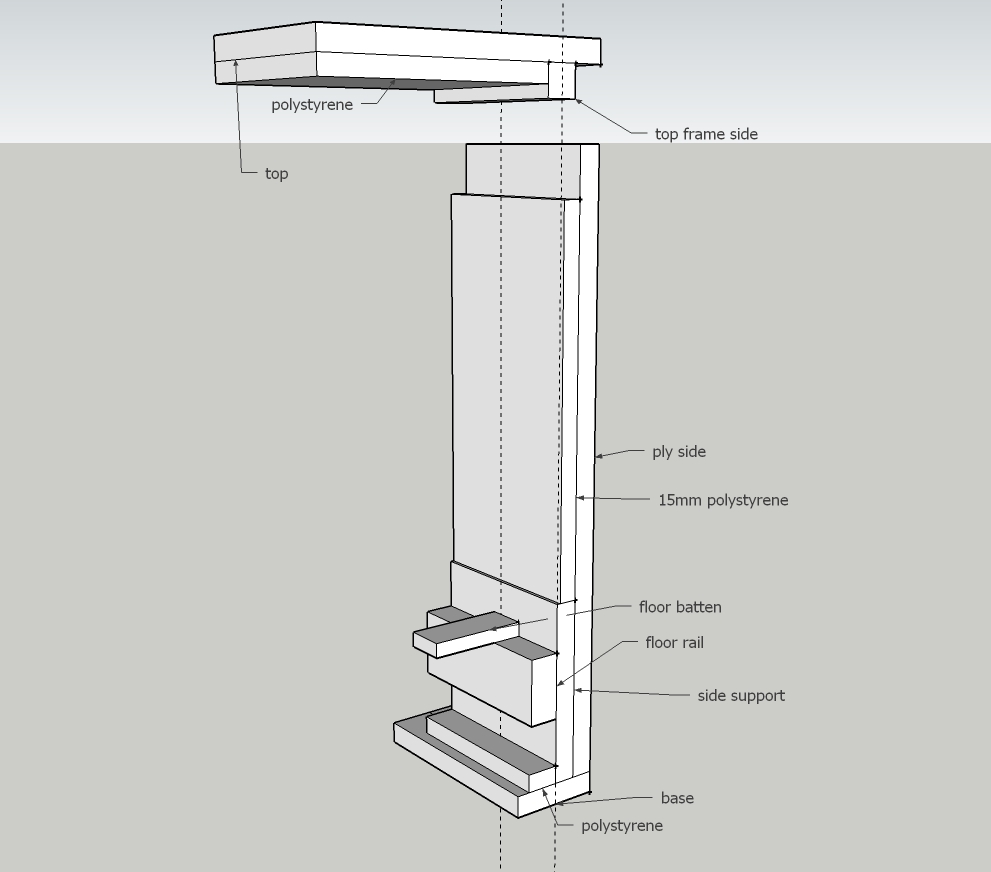
Cut and construct all of the wooden sections first. Glue and screw the four sides to each other and to the base ensuring that all corners are true. Fix the floor rails to the side supports (top edge of rails 40mm below top edge of support) and then fix side supports into the box (I screwed them on from the outside). Since I had cut the floor battens to be a tight fit lengthwise I simply pushed them into place leaving them unfixed (this has the advantage that they can be positioned appropriately for the load and taken out of the way when working on the electrics). The top framing was screwed to the top. Finally a cut-out is required in one face of the box for the temperature controller (size to fit controller - provided it is a tight fit, no other fixing is needed.) Drill a hole for the mains flex at the bottom rear (if the flow is a tight fit in the hole it will help relieve and strain from the cable), and finally I drilled a hole through the top centre slightly larger than an old thermometer that I had left from my photographic darkroom days.
Once all of the cabinet construction was complete, I lined the base, ends, sides above supports, and top inside the frame with polystyrene (I had scrap sheets of 15mm poly kept from some packaging).
 |
Finally do the electrics. Initially I used a single light bulb and no fan which worked fine. I later added a second light bulb (wired in parallel with the first) to provide faster initial heating, and also an old 230V fan from a computer power supply (must be 230V or a transformer will be needed). I wired the fan direct off of the main wires in so that it was on (and hence circulating air whether the lights were on or off). I positioned all wiring, lights and fan below the floor battens, experimenting with different layouts to find the best for overall even distribution of heat. All wires should be clipped back to the frame and all exposed wires covered with insulation tape. If you are using a fan, this also needs to have a wire cage fitted over it to prevent fingers accidentally being inserted whilst the power is on! The controller senser (the double wire supplied with the sensor) can be cut to suit. I cut mine down so that it was about 800mm long (you keep the bit with the sealed end - that's where the sensor is) which I considered more than enough for it to reach wherever I wanted to site it. I drape the sensor over the side of the cabinet whilst loading the cabinet and then drape it over the load so that the sensor is hanging in a good central spot. Put some sort of strain relief inside the cabinet in the mains cable that is running to the plug through a suitable hole near the base on the back face (whichever that will be) - a cable clip will suffice esp if the hole is fairly tight.
I wrapped an elastic band around the thermometer to form a stop about 100mm from the bulb end so that I can fit it into the cabinet as a visual check on the digital temp display on the controller (a totally unnecessary belt and braces job!)
| Part | No per hive | Description |
| Sides | 2 | 680mm x 500mm x 18mm ply |
| Ends | 2 | 420mm x 500mm x 18mm ply |
| Top and Bottom | 2 | 680mm x 420mm x 18mm ply |
| Top frame sides | 2 | 630mm x 25mm x 25mm timber |
| Top frame ends | 2 | 320mm x 25mm x 25mm timber |
| Side supports | 2 | 680mm x 150mm x 18mm ply |
| Floor Rails | 2 | 680mm x 32mm x 25mm timber |
| Floor Battens | 6 | 384mm x 32mm x 12mm timber |
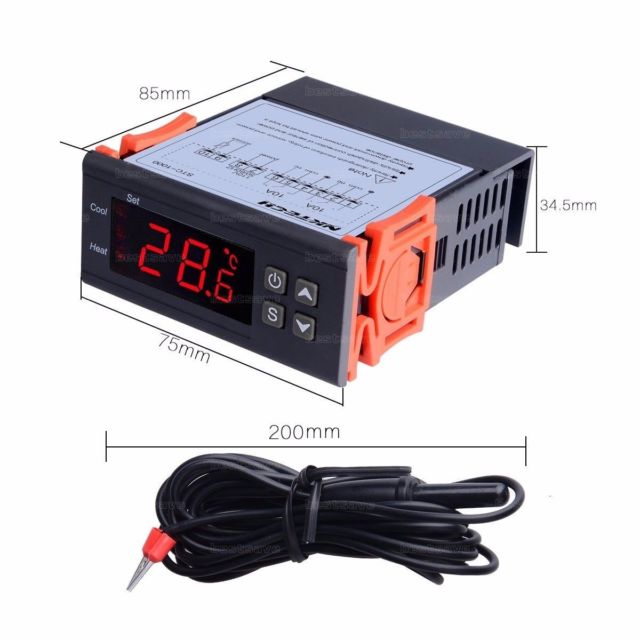
| Thermostat | 1 | STC-1000 Temp Controller |
| Temperature controller | 1 | STC-1000 Temperature Controller |
| Light Bulb | 1 (see Later Modifications) | 60Watt or equiv incandescent |
| Bulb Holders | 1 (see Later Modifications) | Batten holders |
| Cable | 2 metres | 1.5mm twin and earth |
| External Cable | length to reach wall socket | 1.5mm twin and earth flex |
| Plug | 1 | 13amp mains plug fitted with 5amp fuse |
| Cable clips | several | to suit the cables used |
Later Modifications: in addition to adding a second light bulb and fan, I also added 'handles' - two short lengths of wood, one on each end wall to aid carrying.

