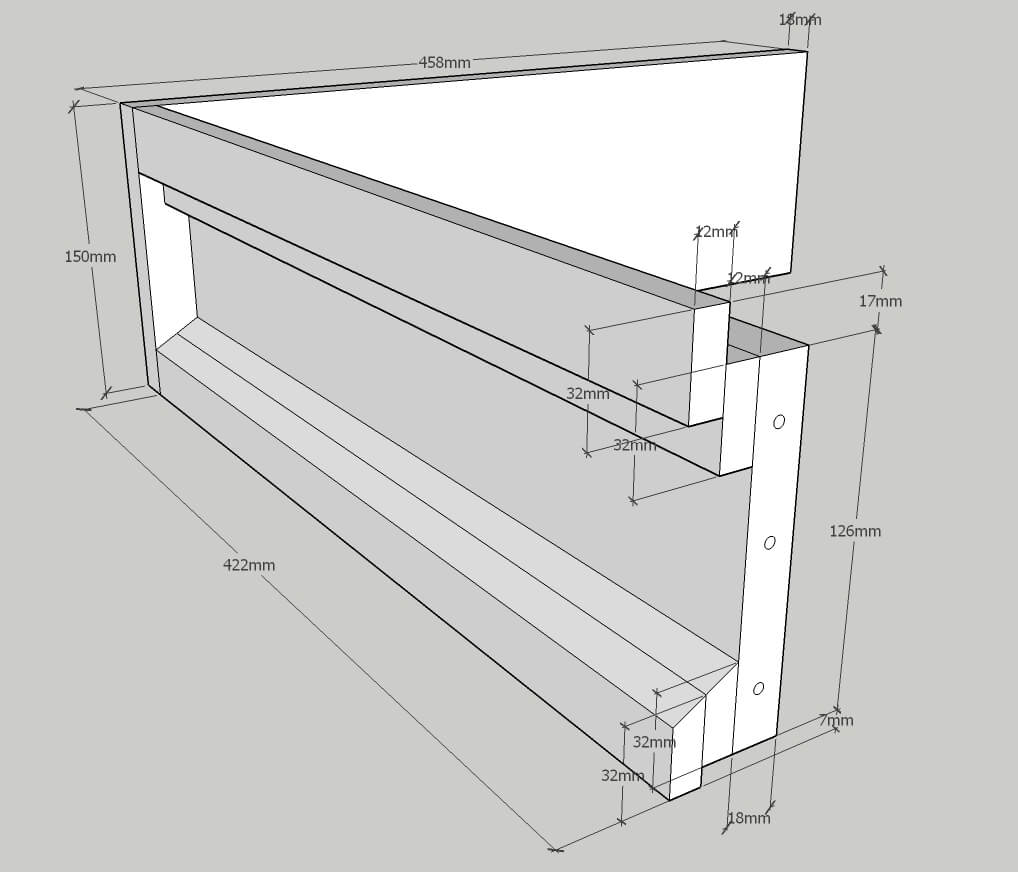
Brood and Super boxes
These boxes form the main components of the hive and the important thing is to ensure that the internal dimensions are correct and all others consistent throughout the entire hive.
The thickness of ply (18mm) and timber (12mm) that was readily available to me gave and overall external dimension of 458mm against the standard 460mm. If different thickness materials are used, some of the measurements below will need to be changed accordingly.
I decided that the easiest way to make each of the side 'rails' was to use two pieces of timber offset one on the other as shown below. If making several hives it is well worthwhile making a simple jig from offcuts of wood to give this offset.
- Parts List
| Part | No per hive | Notes |
| Sides | 2 | cut ply panels 422mm long x 126mm (brood) or x (super) |
| Ends | 2 | cut ply panels 458 long x 150mm (brood) or x (super) |
| Top side rail | 2 | cut two lengths of 12mm x 32mm timber, glue and pin them together with a 17mm offset |
| Bottom side rail | 2 | cut two lengths of 12mm x 32mm timber, glue and pin them together with a 7mm offset. Once dry, chamfer off the outside top edge (see diag)- this is to shed rain. |
- Assembly
First assemble both of the upper and lower side rails. Place one half of the rail on top of the other half, offset it by tight amount (17mm top, 7mm bottom) and draw a line along the edge of on the top half on the bottom half. Glue the bottom half to the line, realign the two halves and nail together with 3 pins (40-50mm). Once the glue is dry chamfer down the top outside edge of the bottom rail (see diag) so that rainwater will be shed off of the hive. I used a power planer for this, but a hand plane or saw could be used.
Once all 4 side rails are prepared, lay one pair face down, glue the top faces and place the side panel on top so that it aligns with the inside edges of the two rails. Nail through the panel into the rails using 25-30mm pins. The sides are now complete.
Finally, drive three pins (40-50mm) into each end of end panels (deep enough that they are about to come through the inner surface) in a vertical line inset 33mm from the end such that they will drive into the side ply panel. Glue the end of the side panel, align and drive the pins home. Repeat for the other 3 corners ensuring that the box is square in construction.
N.B. When assembling, choose the best side of each panel for the outer surface.
Once assembly is complete and the glue dry, coat the outer surface and the top and bottom outer edges with three coats of external grade paint.
https://www.wickes.co.uk/Products/Doors+Windows/Door-Frames+Fixings/Door-Stops/c/1001170
https://www.wickes.co.uk/Wickes-Non-Structural-Hardwood-Plywood-18-x-1220-x-2440mm/p/110037
